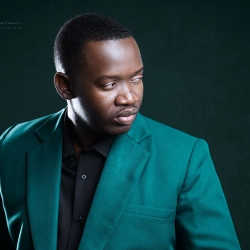


I think I did this shoot back sometime in December of 2019 with the help of Lovena Magloire. I was inspired by another image but to remain subtle just to keep it safe. Unfortunately, I am unable to visually reference that image here because the internet is a vast jungle of images and I don’t remember where I stumbled across it.
My setup for this was really simple and I used very little equipment namely;
- My Canon 80D
- Canon 24mm 2.8 Pancake Lens
- Selens 42″ Octabox
- Selens 10′ C Stand
For the final composite of this image I used Photoshop as well as Portrait Pro 19 in combination. You can watch the video or you can follow the steps that come after.
Before I get started you can follow along by downloading my project files here as well as a trial version of Portrait Pro .
- Starting in the Adobe Bridge, I brought the main image over to Photoshop where I made an evaluation of the image for problematic areas. After this, I went to the layer panel options and created a new layer and grabbed my healing brush to start painting away the imperfections.
- When I was done with imperfections, I created a merged stamp layer by holding all of the modifier keys and E on the keyboard. After this step, I went to the actions panel where I ran a custom skin softening action and used the brush tool to apply it to skin revealed except for the facial skin.
- I merged the stamp layer as well as the layer created by running the previous action by pressing CTRL+E on the keyboard and then I headed over to my filters and ran the Portrait Pro 19 plugin.
- Please review the steps I made using Portrait Pro by watching the video.
- When I was done with Portrait Pro, I returned to Photoshop where I applied some color replacement using a lut that I created attached to an action. As a quick reminder, you can download my luts and project files here
- The first action that I ran was the Dystopian Yellow and Blues. I wanted this color replacement applied only to the background however. So I switched to the brush tool, made sure my foreground color was set at black and my brush opacity was set at 100% and I began painting away from the skin.
- I wanted to apply another lut specifically for brown skin, so I ran my Vintage Brown action however, it was applied to the entire image. No problem.
- My foreground color was still set to black so on the layer mask, I hit ALT+Backspace on the keyboard to remove the adjustment from the complete image and made sure my foreground color was then set to white. I grabbed the brush tool with my opacity now set at 50% and I began to paint on the skin to reveal the color replacement gradually.
- So to aid this composite I decided to apply an ember overlay. I opened the image in a separate window and used the move tool to drag from one window to another. I quickly rotated and scaled the image using free transform and committed the changes.
- The image had a black background that was getting in the way. To get rid of the black, I went to the blend mode for that particular layer and set it to screen. The screen blend mode hides the dark pixels in the image.
- So after nudging the embers layer just where i wanted it to be, I decided that I was done.
So I realize this was a bit wordy but if you got 15 minutes, please enjoy the video. Thanks for following along.